CPSC 110-08: Computing on Mobile Phones
|
In this homework you will create a simple compass app that uses App Inventor's Location Sensor to display the phone's current location and its Orientation Sensor to point to North. The compass needle will be an Image Sprite with an arrow picture. The arrow will always point to North.
Read pages 320-328 of Chapter 23 of App Inventor, Reading and Responding to Sensors (8 pages). This section describes how to use the Location Sensor and Orientation Sensor.
A GPS reading consists of three pieces of data: latitude, longitude, and altitude. Your latitude is your distance in degrees north or south of the equator, with north positive and south negative. The range is -90 to +90. Your longitude is your distance east or west of the Prime Meridian, which goes through Greenwich England. East coordinates have positive values and west coordinates are negative. The values range from -180 to +180. Values on the Meridian are 0.
To find the GPS coordinates of any location on Earth, you can use Lat Long Finder. Trinity's location is:
Latitude = 41.7512, Longitude = -72.6904
Lat    = 41 degrees,   45.1 minutes   North
Long = 72 degrees,   41.4 minutes   West
NOTE: In its current implementation, the location sensor will get results from the phone only if the app has been packaged and downloaded to the phone.
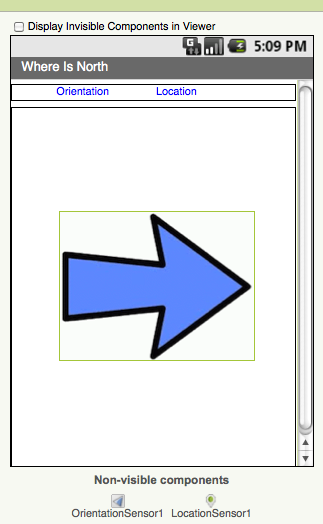
Create a new App Inventor project named WhereIsNorth. The user interface for this app uses the following visible components. Follow the layout provided in the snapshot.
Drag these items onto the Viewer from the Palette. Place the two Labels inside the Horizontal Arrangement component at the top of the screen as shown in the snapshot below. Place the Canvas below the buttons and place the Image Sprite in the center of the canvas.
For the Image Sprite component, download this arrow.gif image and upload it as the image file for the sprite's Picture property.
It's a good idea to rename some of these components so they will be easier to keep straight in the Blocks Editor. Use the following names (no internal spaces):
Adjust the Properties of the visible components as follows:
This app uses two invisible components, an Orientation Sensor and a Location Sensor, in the Sensors drawer. To read the documentation on the orientation sensor and location sensor you can click on the "?" next to the component's name.
Drag each of these onto the Viewer and set their properties as follows:
When you're done with the user interface, it should look like the picture shown here (click to enlarge).
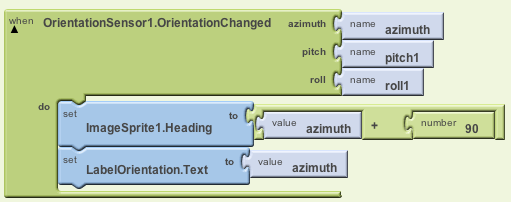
To get the arrow to act like a compass needle we need to change its screen orientation whenever the phone changes its orientation. Open the Orientation Sensor drawer under the My Blocks tab and pull out the when OrientationSensor.OrientationChanged block. This block will fire whenever the phone is moved in space.
Notice that it has three arguments, for azimuth, pitch, and roll. For this app we are only interested in the azimuth. The azimuth value will be 0 degrees when the top of the phone is pointing due North. On the other hand, the Image Sprite will be 0 degrees when it is pointing toward the right edge of the screen. To adjust for this difference, we want to add 90 to the azimuth and make this the direction that the arrow points. We also want to display the azimuth value on the LabelOrientation. Code your OrientationBlock so it looks like this:
If you have your phone connected to your computer, you should now have functioning compass. (It works better outdoors.)
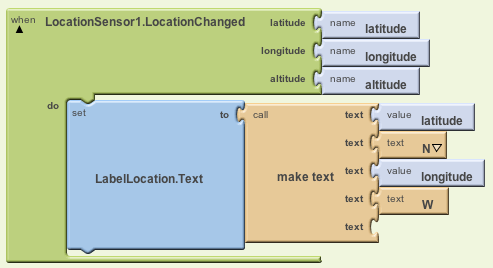
Add a block that will display the phone's location on the LabelLocation label. Find the when LocationSensor.LocationChanged block and add code to it that will simply set the label to the sensor's latitude and longitude. It should look like this:
NOTE: In its current implementation, the location sensor will get results from the phone only if the app has been packaged and downloaded to the phone.